How to Buy Your First Camera: The Ultimate Beginner’s Guide 2025
- Jcrews
- Jun 28, 2025
- 11 min read
Updated: Jun 28, 2025
So you’re ready to jump into photography — that’s awesome! But let me be real with you: buying your first camera can feel like a maze. Tons of confusing terms, options, and choices. I get it. That’s why I want to walk you through it all, gently and clearly, so you feel confident picking the perfect camera for you.
I’ll cover everything — the kinds of cameras, what sensor sizes mean, how lenses fit in, and the key camera settings you’ll want to understand. And I’ll keep it easy to follow, with examples and tips for beginners like yourself.
What Kind of Camera Should You Get?
Let’s start by talking about the main types of cameras you’ll find:
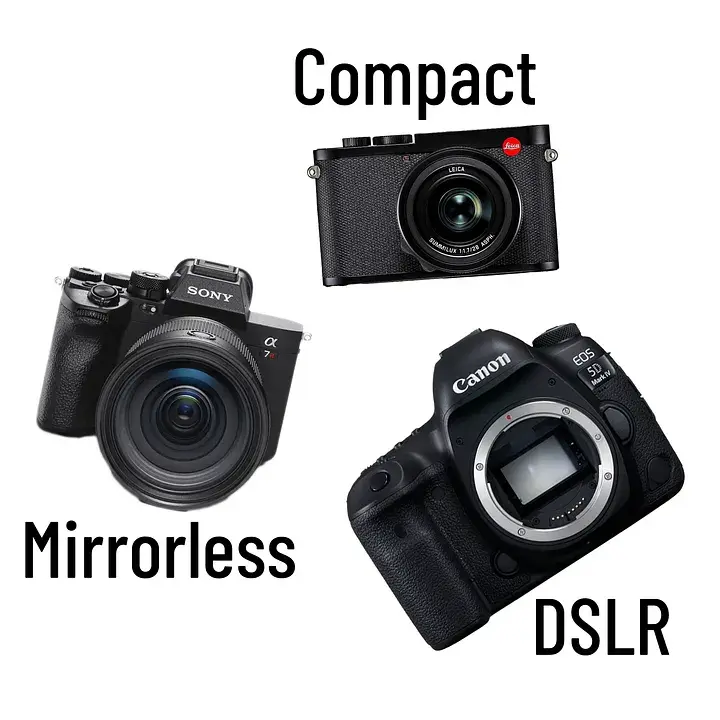
DSLRs: These are the classic “big” cameras you’ve probably seen. They use a mirror inside to show you the scene through an optical viewfinder. DSLRs are great because they last long on battery and have tons of lens options. But, they can be bulky.
Mirrorless Cameras: These are newer and don’t have that mirror. Instead, they use electronic viewfinders or screens. They’re usually smaller, lighter, and super fast at focusing. Perfect if you want to travel light or want quicker autofocus. They might need charging more often, though.
Compact Cameras: Small and simple — perfect if you want something to just grab and shoot with no fuss. But they don’t have interchangeable lenses or as many manual controls.
If you want, I can help you figure out which type fits your lifestyle best!
Sensor Size — Why Does It Matter?
The sensor is the soul of your camera—a light-sensitive chip that turns photons into pixels. Its size affects everything from image quality and depth of field to noise levels, lens compatibility, and even the look of your photos.
What Bigger Sensors Do Better:
More Light = Less Noise
Larger sensors have bigger photodiodes (pixels), which absorb more light. This means cleaner images in low-light situations—think nighttime street photography or indoor concerts.
Shallower Depth of Field
Full frame sensors help create that creamy, blurry background (bokeh) that portrait photographers love. This is trickier to achieve with smaller sensors unless you use specialized lenses.
More Dynamic Range
Larger sensors can better capture the details in both shadows and highlights, ideal for dramatic lighting or landscapes at sunset.
Sensor Size | Size (mm) | What It Means for You | Who Should Choose This |
Full Frame | 36 x 24 | Best image quality and low-light ability | Photographers if budget allows |
APS-C | ~22 x 15 | Great all-rounder, more affordable | Some beginners and hobbyists |
Micro Four Thirds | 17.3 x 13 | Small and light, great for travel | Travelers and street photographers |
1-inch | 13.2 x 8.8 | Compact but limited zoom and lenses | Casual shooters |
Smartphone | ~6 x 4 | Tiny sensor, okay for quick snaps | Everyone with a phone |
If you’re shooting mostly outdoors, APS-C or Micro Four Thirds are awesome because they’re affordable and still look great. If you want super clean night shots or portraits with dreamy backgrounds, consider full frame.
Real Camera Examples — What Sensor Size Means in Action
📷 Canon EOS R6 Mark II (Full Frame, 36 x 24 mm)
The R6 Mark II has a full-frame sensor, which means it captures more light, more detail, and delivers richer bokeh compared to smaller-sensor cameras.
What this means: You get crisp low-light shots with less noise, perfect for nighttime cityscapes or weddings. It also makes subject-background separation buttery smooth in portraits.
Check it out on Amazon - https://amzn.to/3I1QM53
📷 Canon EOS R50 (APS-C, approx. 22.3 x 14.9 mm)
This is an APS-C camera, great for everyday shooting—smaller sensor, smaller price, still impressive quality.
What this means: You’ll see a crop factor (1.6x), so a 50mm lens behaves more like 80mm—handy for wildlife or sports. Low-light performance is solid, just not quite as clean as full frame.
Check it out on Amazon - https://amzn.to/44mjIfx
📷 Olympus OM-D E-M10 Mark IV (Micro Four Thirds, 17.3 x 13 mm)
This lightweight option uses a Micro Four Thirds sensor, ideal for travel bloggers and street photographers.
What this means: You trade a bit of image quality and bokeh for serious portability—your gear weighs less and fits in a small bag.
Check it out on Amazon - https://amzn.to/4lcVxaQ
📷 Sony RX100 VII (1-inch sensor, 13.2 x 8.8 mm)
This pocket-sized powerhouse fits a 1-inch sensor into a compact body.
What this means: Great for on-the-go shooting with better quality than a phone, though it won’t match the background blur or night performance of larger sensors.
Check it out on Amazon - https://amzn.to/45RhQOt
📱 iPhone 15 Pro (Smartphone, ~6 x 4 mm)
Even the latest smartphones use tiny sensors, though computational photography has leveled the playing field.
What this means: Fantastic for quick shots and social sharing, but don’t expect it to keep up in low light or print at large sizes.
Check it out on Amazon - https://amzn.to/44nbmo5
Lens Mounts — It’s Like Picking a Team
When you buy your first camera, you’re not just buying a camera — you’re picking a whole system.
That means:
The camera body
The lens mount it uses
And all the lenses and accessories that work with it
A lot of beginners only focus on the camera body when buying — but trust me, your lenses matter even more in the long run. The camera body will get old, but good lenses can last for 10+ years and grow with you.
So think of the mount system like choosing your "team." Once you pick Canon, Sony, Nikon, etc., you're mostly building your lens collection around that ecosystem.
A Closer Look at Popular Lens Mount Systems
Brand | Mount Name | System Type | What It Means for You |
Canon | EF (DSLR), EF-S (Crop DSLR), RF (Mirrorless) | DSLR & Mirrorless | Huge library of lenses (new and used). RF is future-focused but pricier. EF has great affordable options. |
Nikon | F (DSLR), Z (Mirrorless) | DSLR & Mirrorless | F-mount has decades of lenses. Z-mount is newer with excellent sharp lenses (but fewer options currently). |
Sony | E (Crop & Full-Frame Mirrorless) | Mirrorless only | Super popular for video and photo. Tons of third-party lenses (Sigma, Tamron). Well-supported. |
Micro Four Thirds (Panasonic/Olympus) | MFT | Mirrorless only | Compact, lightweight, and shared between brands. Tons of small lenses. Great for travel & video. |
Fujifilm | X (Crop Sensor) | Mirrorless only | Amazing image quality and stylish design. Limited third-party lens options but growing fast. |
Leica / L-Mount Alliance | L-Mount | Mirrorless (Full Frame) | Shared by Leica, Sigma, and Panasonic. High-end lenses, great image quality — more niche. |
Real Talk: What Should You Do as a Beginner?
Here’s how to think about it:
Do you want room to grow? Choose a mount system with lots of lens options (like Sony E, Canon RF/EF, Nikon Z).
Want affordable gear? Look for systems that support third-party lenses (like Tamron and Sigma), which work great and cost less.
Travel light? MFT or Fuji X are fantastic for compact setups.
Thinking long term? Mirrorless is the future. Most brands are slowly phasing out DSLRs.
Can You Use Adapters?
Yes… but it’s not always perfect.
Canon EF lenses can be adapted to Canon RF bodies pretty well — Canon’s own adapters work great.
Nikon F to Z works with Nikon’s FTZ adapter.
Sony E has tons of adapters available, but compatibility varies.
BUT: Autofocus can be slower or unreliable with adapters. You also might lose features like eye-tracking or video autofocus. If you’re new, this can be frustrating. It’s usually best to buy lenses made for your mount.
Pro Tip: Plan for Your Future Self
Think of it like this:
Your first camera might cost £800, but the lenses you buy can end up costing thousands over time. So pick a system you actually want to grow into.
Let’s say you start with a Canon R50 (Canon RF mount). Great! In a year or two, if you upgrade to an R6 or even an R5, you won’t need new lenses — you just keep building your kit.
That’s why photographers say “invest in glass,” not bodies.
Great budget friendly cameras
✅ Canon EOS R50 (Mirrorless APS-C) — Compact, smart autofocus, great for new creators
✅ Nikon Z30 (Mirrorless APS-C) — Vlogger-friendly, affordable, easy to use
✅ OM System OM-5 (formerly Olympus) — Weather-sealed, great stabilization, travel-ready
The Exposure Triangle — Your Best Friend for Great Photos
Now, let’s talk about the magic trio that controls how your photo looks: aperture, shutter speed, and ISO.
Aperture (f-stop)
Imagine your lens is like your eye’s pupil — it can open wide or narrow to let in more or less light. Lower f-stop numbers (like f/1.8) mean the lens opens wide, letting in lots of light and creating blurry backgrounds. Higher numbers (f/16) mean less light but more of the scene in focus.
If you want portraits with beautiful blurry backgrounds, aim for a wide aperture. For landscapes where you want everything sharp, pick a smaller aperture.
Shutter Speed
This is how fast your camera’s shutter opens and closes. Fast shutter speeds (like 1/1000 sec) freeze action, while slow speeds (like 1/30 sec) let in more light but can cause blur if you or your subject moves.
Pro tip: For sports or kids running around, use a fast shutter speed. For creative long exposure shots (like star trails), you’ll want slow shutter speeds — but make sure you use a tripod!
ISO
ISO controls how sensitive your sensor is to light. Lower ISO values (100-400) mean crisp, clean images but need more light. Higher ISO (1600 or more) brighten your photo but add noise (grainy texture).
Modern cameras handle high ISO better than older ones, but it’s still a good idea to keep ISO as low as possible.
Setting | What it Does | When to Use It | Beginner Tip |
Aperture (f) | Controls light and background blur | Low f for portraits, high f for landscapes | Practice changing aperture to see effect |
Shutter Speed | Controls motion blur or freeze | Fast for action, slow for night shots | Use tripod for slow speeds |
ISO | Sensor brightness and noise level | Low ISO for daylight, high ISO for indoors | Avoid very high ISO unless necessary |
The Exposure Triangle in Harmony: Putting it All Together
Now, here's where the magic really happens. Aperture, Shutter Speed, and ISO are not isolated controls; they are interconnected. Think of them as a team, constantly balancing each other out. If you change one setting, you'll often need to adjust one or both of the others to maintain a correct exposure (not too bright, not too dark) and still achieve your desired creative effect.
Here's how to think about it in practice:

Define Your Creative Priority:
Motion Blur? (e.g., silky water, light trails) Your priority is Shutter Speed. Pick a slow speed.
Shallow Depth of Field? (e.g., blurry background portrait) Your priority is Aperture. Pick a wide aperture (small f-number).
Freeze Action? (e.g., sports, fast pets) Your priority is Shutter Speed. Pick a fast speed.
Maximum Sharpness from Front to Back? (e.g., landscape) Your priority is Aperture. Pick a narrow aperture (large f-number).
Adjust for Light: Once you've set your priority, you'll need to balance the other two settings to get the right exposure for the available light.
Scenario 1: Bright Sunny Day, Portrait with Blurry Background
Priority: Blurry background. Set Aperture to f/2.8.
Result: Lots of light coming in.
Adjustments: You'll likely need a very fast Shutter Speed (e.g., 1/1000 sec or faster) to prevent overexposure. Keep ISO at its lowest (e.g., 100) for maximum image quality.
Your photo will look like this: [Insert a picture of a well-exposed portrait with a blurry background, taken in bright light]
Scenario 2: Dimly Lit Indoor Event, Freezing Action
Priority: Freeze action. Set Shutter Speed to 1/500 sec.
Result: Very little light coming in due to the fast shutter.
Adjustments: You'll need to open your Aperture as wide as your lens allows (e.g., f/2.8 or f/4) to let in more light. Even then, you'll almost certainly need to significantly increase your ISO (e.g., 3200, 6400, or higher) to get a proper exposure. Be prepared for some digital noise, but an in-focus, noisy shot is often better than a blurry, clean one!
Your photo will look like this: [Insert a picture of a well-exposed, frozen action shot indoors, showing some high ISO noise if applicable]
Scenario 3: Night Landscape, Long Exposure for Star Trails
Priority: Long exposure. Set Shutter Speed to 30 seconds (or even longer with a remote shutter release).
Result: Lots of light over a long period.
Adjustments: You'll need to use a tripod! Set Aperture to a narrower setting (e.g., f/8 or f/11) to get everything in focus and to help control the vast amount of light coming in over that long duration. Your ISO should be kept as low as possible (e.g., 100 or 200) to minimize noise during the long exposure.
Your photo will look like this: [Insert a picture of a star trail or silky night landscape, clearly showing long exposure effects]
Tripod Model | Key Features | Best For | Amazon Affiliate Link |
Manfrotto Befree Advanced | Lightweight, sturdy, compact | Travel & landscape | |
Joby GorillaPod 3K | Flexible legs, versatile mount | Vlogging & on-the-go | |
Vanguard Alta Pro 2+ | Adjustable angles, stable base | Studio & outdoor shoots | |
Benro Aero 4 Carbon Fiber | Lightweight, fast setup | Travel & sports | |
Peak Design Travel Tripod | Ultra-compact, durable design | Travel & everyday use |
The Power of Practice
Understanding the Exposure Triangle conceptually is a great first step, but truly mastering it comes through practice, practice, practice!
Set your camera to Manual (M) mode. This forces you to control all three settings.
Experiment with different scenarios: Go outside on a sunny day, then indoors, then try low light.
Adjust one setting at a time and observe how the exposure changes, and then how you need to adjust the others to compensate.
Analyze your photos: Look at the brightness, the sharpness, the blur, and the noise. Connect these observations back to the settings you used.
There's no single "correct" setting for any given scene. The magic of photography lies in using these three controls to express your creative vision. So grab your camera, embrace manual mode, and start making your photos look exactly the way you imagine them!
Great intermediate friendly cameras
✅ Canon R6 Mark 2 (Mirrorless) — Compact, smart autofocus, great for new creators
✅ Nikon Z5 (Full Frame Mirrorless) — Vlogger-friendly, affordable, easy to use
✅ OM System OM-5 (formerly Olympus) — Weather-sealed, great stabilization, travel-ready
Autofocus and Other Features That Help You Nail the Shot
Autofocus (AF) is like your camera’s eyes — it helps lock onto your subject and keep it sharp. Modern mirrorless cameras have super smart AF systems that can track eyes and faces, which is amazing for portraits and action shots.
There’s also focus bracketing — this means the camera takes a series of shots at different focus points that you can combine later for ultra-sharp images from front to back. This is especially useful if you want to shoot tiny things up close or sweeping landscapes.
What Are You Going to Shoot? Matching Features to Your Style
Everyone’s photography journey is different. Here’s a simple guide to help you pick what suits your style best:
Battery Life and Portability — Don’t Get Caught Without Power
DSLRs typically last longer because they use an optical viewfinder that doesn’t drain the battery. Mirrorless cameras rely on electronic displays, so they tend to use more power.
If you plan to shoot all day or travel, consider bringing extra batteries or a portable charger.
Don’t Forget the Extras!
A camera is just one piece of your photography puzzle. Good lenses, memory cards, tripods, bags, and extra batteries are all important.
Lenses especially — sometimes they cost more than the camera body! But a good lens will make a bigger difference in your photos than upgrading your camera body right away.
Final Thoughts — You’ve Got This!
I hope this helps you feel less overwhelmed and more excited about choosing your camera. Photography is a fun adventure, and the right gear will just help you capture the moments you care about most.
If you want, I’m here to help with camera suggestions, lens choices, or even tutorials on how to use your new camera.

Dont Forget any Photography accessories
Accessory Type | Product Name / Description | Why It’s Useful | Affiliate Link Placeholder |
Camera Strap | Peak Design Slide Lite | Comfortable, adjustable, quick-release anchors | |
Cleaning Kit | Altura Photo Cleaning Kit | Includes air blower, lens pen, cleaning spray | |
Lens Filters | K&F Concept ND Filter Set | Great for long exposures and creative effects | |
Memory Card Case | Pelican 0915 SD Card Case | Protects memory cards from dust, water, impact | |
Remote Shutter | Pixel TW-283 Wireless Remote | Ideal for long exposures, night shots, timelapses | |
Rain Cover | Movo RC1 Clear Rain Cover | Keeps gear safe during bad weather or hiking | |
Screen Protector | Expert Shield Glass for DSLR/Mirrorless | Protects LCD from scratches without glare | |
Battery Pack | Wasabi Power Spare Batteries + Charger Set | Extra power for long shoots or travel days |
Hey! Just a heads-up:
Some of the links here are Amazon affiliate links. If you click and buy something, I might earn a tiny commission (at no extra cost to you!). It helps keep this blog going — and I really appreciate the support! 💛📸


Comments